


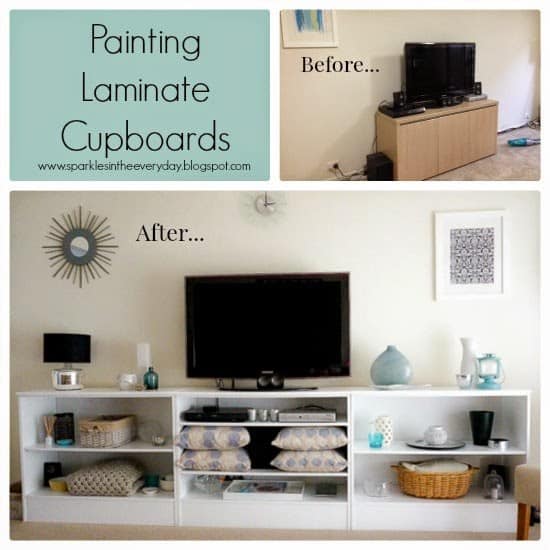
All the steps to Transforming an Old, Scratched Bookcase!

Sometimes it doesn't take much to transform a piece of furniture from something drab to something with style. All it takes is the idea and a lick of paint!
I have had this bookcase in different parts of my house for a loooooooong time. It has been a formal bookcase for books, been in my boy's room for storage for their toys and recently it has been in my garage, storing tools. ( I know, I know, what a waste).
After seeing these bookcases in my local furniture store, selling for $1000!!!.... I really did take notice that the only thing that my bookcase needed was a fresh coat of paint.
Being that the book case was made of 'real wood' not laminate or made of cardboard, it is even more important to save her. I decided to give her (of course she is a 'her') a facelift and give her a coastal feel, with glossy white paint.
Transforming an Old, Scratched Bookcase!
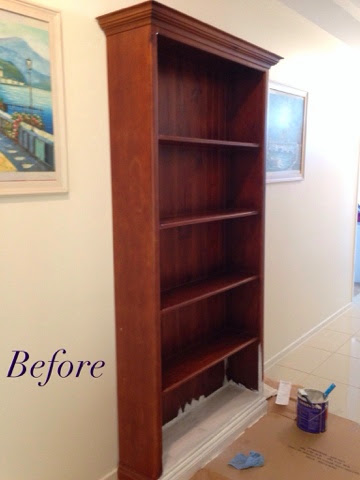
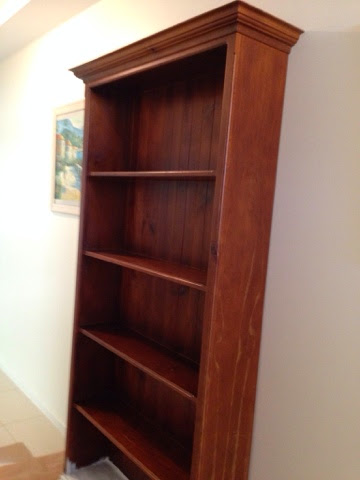
Before .....
Step 1
I started with giving her a good clean, a light sand and removed any traces of grease and then once she was dry, I began with the primer or undercoat. Using a primer is so important especially painting over a stain. You do not want the stain to start to 'bleed' through the white paint after a while.
Step 2
When applying primer, I always think I have made a mistake. The primer looks streaky and patchy. Even after the second coat, it does not look good. Don't give up...as soon as the first coat of top coat goes on, you can breath a sigh of relief (yep it is worth doing the primer.)
I know that chalk paint is all the rage now and I am really keen to try the home made version, but this book case needed to shine, so a glossy enamel water-based paint, was the way to go.
(Sorry for the wonky photos...this was last at the last minute, when I realised I had no photos of the 'before' stage and quickly whipped out my i-Phone and snapped it with messy, paint-covered fingers.)
I love painting!... I think it is because the constant brushing and rolling allows me to relax, especially with music on and I let my imagination run away with me. I especially love transforming furniture. I think it has something to do with making the most of what you have and not just throwing something away because of it's look. It is really satisfying finding something that is stashed in a garage or thrift shop, that no-one wants and creating a useful, gorgeous statement piece.
Step 3
So back to the painting....
After two coats of the primer, I applied the first coat of water-based enamel. I used a brush to cut in at the corners and edges and used a mini roller to smooth on the paint, so there would be no brush marks.
After 3 coats, she turned out to be beautiful!!
The trick was to wait a day or two between each coat and then few days after painting her, to allow the paint to cure, so that her shelves weren't tacky.
Tip- I always wrap my brushes and roller in cling film (plastic wrap), so I don't need to wash out the brushes and rollers everyday. Wrapping them tightly in the plastic wrap means no air can get in and dry the paint. I have left my brushes like this for days and to simply come back, unwrap them and start painting again. You save a lot of time, money and less mess doing it this way.
Now she sits in my living room with all the little bits and bobs to make her pretty and shine! ...and all with just a few coats of paint!
And after ...
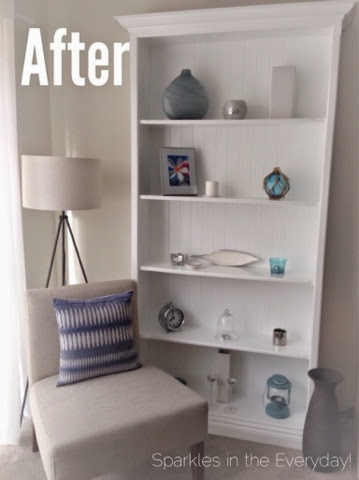
Useful and now pretty!
Is there something in your home that just needs a lick of paint?
🙂
You might also like .....


monkey
very nice she looks brand new and gordeous xx
Kristen Campbell
Beautiful! I LOVE paint! So many possibilities! Thanks so much for taking the time to link up with us over at the #HomeMattersParty - we hope to see you again this Friday! Feel free to bring a friend 🙂