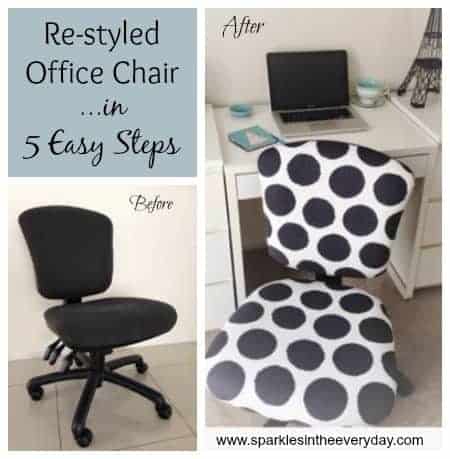
• Skip to primary navigation
  • Skip to main content
  • Skip to primary sidebar
  • Skip to footer

Sparkles in the Everyday! logo

  • Home
  • Everyday Recipes
    • Breakfast
    • Soups
    • Entertaining
    • Desserts
    • Top Recipes!
    • Vegetarian
  • Gluten-Free Recipes
    • Gluten-Free Savoury
    • Breakfast
    • Soups
    • Gluten-Free Desserts!
    • Gluten-Free Cakes and Muffins
    • Entertaining
    • Cookies!
  • Wellbeing
    • Lifestyle
  • Home Ideas
    • Gardening
    • DIY – Art and Craft!
    • Christmas Ideas!
  • About
    • Contact, Terms and Privacy Policy
You are here: Home / DIY - Art and Craft! / DIY Re-styled office chair in 5 easy steps….

DIY Re-styled office chair in 5 easy steps….

July 28, 2014 By Barb

re-styled office chair in 5 easy steps

DIY – Re-styled Office Chair in 5 Easy Steps

 Ever looked at your office chair and thought it looked a bit drab. Well, it is easy to give it some style and a new look….in 5 easy steps!
I was given this office chair for free (…got to love that) and it sat in my garage for a while.
old office chair
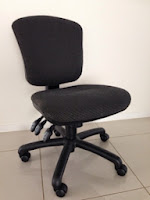
It was really comfortable but just looked a bit blah! …. So I decided to give it a face lift. I have a little office space in my house where it would go perfectly.
I wasn’t sure it would be easy to do but really it was…. ( insert surprised look here :-0 ). So easy in fact, it only took 5 steps, a piece of material and a staple gun.
DIY re-styled office chair

DIY – Re-styled Office Chair in 5 Easy Steps!

base of chair - re-styled office chair

Step 1

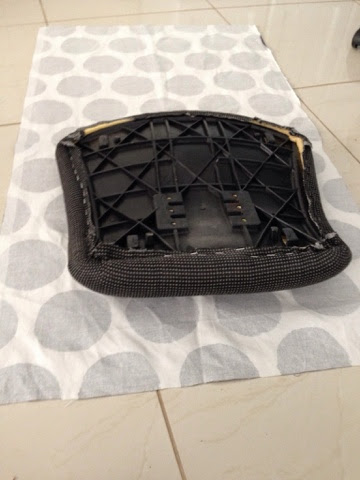
Remove the the bottom chair pad by unscrewing the screws that attach it to the chair. Remove the plastic backing. Mine had one screw to remove and the plastic just came off (too easy).
covering base - re-styled office chair

Step 2

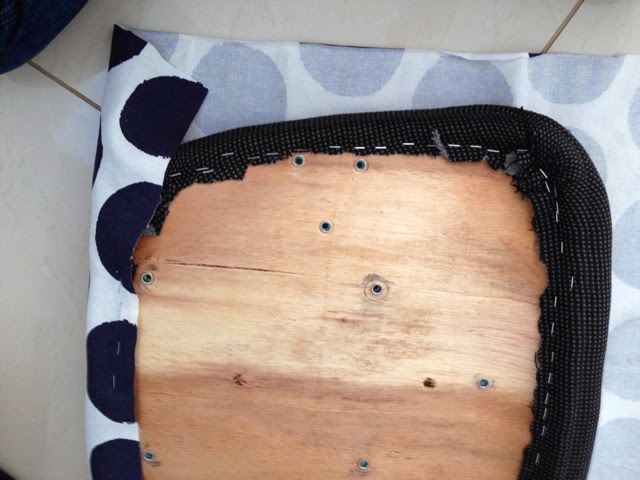
Place your material down and then the chair pad ( and ensure you have enough material to cover the sides. I didn’t remove the cover that was already on the chair as it gave the chair pad shape (and had way too many staples to remove 😉 ….. ) also you couldn’t see through my material (upholstery fabric that only cost $10.00 on sale )
base of chair - re-styled office chair

Step 3

Staple the material onto the chair paid using a staple gun (…watch your fingers)
A little tip is to make sure you pull on the fabric as you staple,  to ensure it is smooth when you turn it over. Also when going around the corners make a few little folds so that it doesn’t bunch up and it looks more professional).  Screw the plastic cover back on.
covering top - re-styled office chair

Step 4

Screw the chair pad back onto the chair…looking good isn’t it ?
covering top - re-styled office chair

Step 5

Do the same process for the back rest and you are finished.
 When I removed the plastic cover on the back rest, it was a little tricky because there wasn’t a screw to release it. I pulled back the plastic with a screwdriver so I could see inside and used my iPhone torch to see what was holding it together.
There were 4 little clamps and with some squeezing on the sides of the backrest and a quick tuck the plastic just fell off (I did have some help to do this as I didn’t have enough arms…happy to have a teenage son with some!  …. )  
re-styled office chair
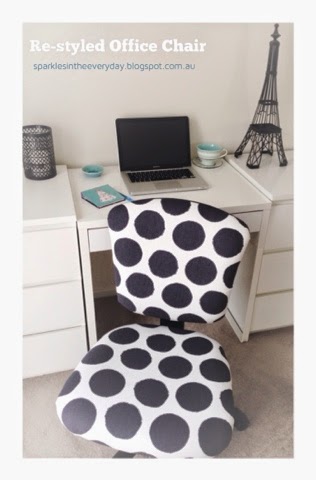
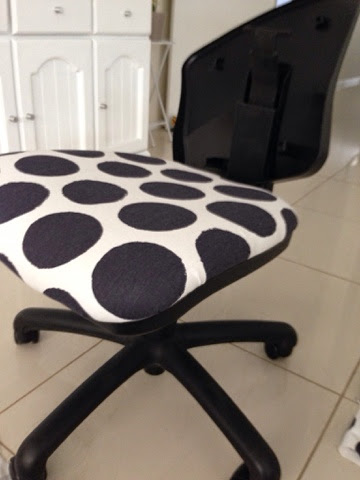
Ta da!!!!! Re-styled office chair in all it’s glory.
I just love the way it adds a bit of flair to my little office space.
🙂
DIY re-styled office chair
re-styled office chair in 5 easy steps
Pinterest image

You can pin these steps to your Pinterest board, to remind you when you need to up-date an old office chair.

Simply hover over an image and the Pinterest sign will come up, so you are able to click on it to save it to your Pinterest board.

You can follow along for other great DIYs and lots more by following the Sparkles In The Everyday Pinterest Board.

You might also like….
From recycled bottles to beautiful vases
DIY Recycled Bottles to Beautiful Vases  
Note Board hack
Note Board…Beautified!

Related

Previous Post: « Nutella Chocolate Milkshake (easy but soooo delicious!!!)
Next Post: Ahhhhh moments! ….. »

Reader Interactions

Comments

  1. Tamara @ Provident Home Design

    August 18, 2014 at 9:59 pm

    Awesome job, Barb! It looks so much fresher and stylish with the new fabric!! Great work! 🙂

    Reply
  2. 998b7e4e-fbd2-11e3-b7a3-6f5cc238543b

    August 19, 2014 at 5:24 pm

    This looks great! I liked it with the bottom recovered and it still had the black for the back(top). Kind of like a 'skirt and blouse' look for the office. It looks good either way.

    Reply
  3. Elise

    August 29, 2014 at 12:27 am

    Now I am wishing I hadn't given my ugly Wal-Mart chair away when I moved. Dang it. This looks adorable and I love the polka dots!

    Reply
  4. Christy James

    September 21, 2014 at 2:32 pm

    Love this transformation! XO

    Reply
  5. Marcia Pilar

    September 29, 2014 at 2:55 pm

    Oh how fun! Love the black and whites today. Great makeover.
    G'day!

    Reply
  6. Carrie

    September 14, 2015 at 2:50 pm

    I would have never thought to recover an office chair like that! Love your fabric choice! I hope you’ll consider linking up this office chair and all of your other furniture makeovers to Friday’s Furniture Fix! Doors open every Thursday night at 9:00PM EST and close on Monday’s at 11:59PM EST. Hope to see you there!… Carrie http://thirtyeighthstreet.blogspot.com/2015/09/week-7-fridays-furniture-fix.html

    Reply
  7. Amy

    September 23, 2015 at 10:22 am

    What a difference! I love it and you can’t go wrong with polka dots. Thanks for sharing it at the Pretty Preppy Party!
    XO,
    Amy

    Reply
  8. brett

    September 25, 2015 at 12:16 am

    Love it – I so wish I had thought to do that before tossing a few of these chairs! Looks great and I’m featuring it today from the Pretty Preppy Party – thanks for linking up! xx, b

    Reply
  9. Dachelle

    June 11, 2016 at 4:33 am

    So cute! I love it!

    Reply

Leave a Reply Cancel reply

Your email address will not be published. Required fields are marked *

Primary Sidebar

logo
Food Advertisements by

Top Recipes!

Top Recipes

Welcome!

Hi! I’m Barb and this is where I share the simple ‘sparkles’ of everyday life.

Often it is the little things that make an ordinary day – great!

Delicious everyday meals, gluten-free recipes, home cooking, easy crafts, DIY home ideas, lifestyle tips, wellness, inspiration and lots more!
Welcome!!  😀

Follow Along

  • Bloglovin
  • Facebook
  • Instagram
  • Pinterest
  • Tumblr
  • Twitter

Recent Post!

Vegetarian, Gluten-Free Mushroom Stroganoff!

Vegetarian, Gluten-Free Mushroom Stroganoff!

Reader's Popular Posts

  • The Best Gluten Free Banana Cake Ever!! The Best Gluten Free Banana Cake Ever!!
  • Easy Gluten-Free Toblerone Cheesecake recipe Gluten-Free, No-Bake Toblerone Cheesecake!
  • Curried Minced Chicken - GF Everyday Meals - Curried Minced Chicken
  • Delicious Gluten Free Lemon Yoghurt Muffins Fluffy Gluten Free Lemon and Yoghurt Muffins!
  • Gluten Free Bread in a Bread Machine Gluten Free Bread....made in a Bread Machine!!
  • How to cook Chicken Mignon The Tips To Cooking Delicious Chicken Mignons!
  • Easy Gluten Free Lemon Cake!! Gluten Free Easy Lemon Cake!!
  • Crisp Australian Anzac Biscuits (gluten-free option too) recipe Australian Anzac Biscuits (Gluten-Free option too)
  • Moist Gluten Free Almond and Carrot Cake recipe! Gluten Free Almond and Carrot Cake!!!
  • Gluten Free Rocky Road recipe! Gluten Free Rocky Road!!
logo
Food Advertising by

Search

Follow Barb's board From the blog - Sparkles in the Everyday! on Pinterest.
gluten free recipes - sparklesintheeveryday.com

Subscribe!

Categories

Our Sponsors!!

LED-me

Online LED Shop for High Quality Energy Saving LED Light Bulbs, Globes, Lamps and Home Automation Products. Delivered Australia wide.

Privacy & Cookies: This site uses cookies. By continuing to use this website, you agree to their use.
To find out more, including how to control cookies, see here: Cookie Policy

Search….

Footer

Search

Copyright

All images and tutorials on this blog are copyrighted material.
Please contact me if you would like to use any media (photos), tutorials or ideas from this blog.
I would be happy to allow you to use ONE photo with appropriate credit and link back to www.sparklesintheeveryday.com

Absolutely no text or tutorials can be replicated. All photography and content is created by the owners of www.sparklesintheeveryday.com unless otherwise stated.

Terms and Privacy Policy

Contact

                    Email : sparklesintheeveryday@gmail.com

Categories

Archives

[adsense_hint]

Copyright 2014-2018© 2019 www.sparklesintheeveryday.com·

×
  • Home
  • Top Recipes!
  • Gluten Free Recipes
  • Everyday Meals!
  • Home Ideas
  • DIY – Art and Craft!
  • Wellbeing
  • About
  • Contact, Terms and Privacy Policy

Modern Mobile Menu Social icons

    • Bloglovin
    • Facebook
    • Instagram
    • Pinterest